 I think it safe to say
that most physical self defense situations that we are likely to experience will be prefaced with some sort of grab to or contact with one, if not both, of our arms. There are literally hundreds of techniques that can be used. I would like to discuss a response to a same side wrist grab which culminates in a Cross Body Arm Bar.
I think it safe to say
that most physical self defense situations that we are likely to experience will be prefaced with some sort of grab to or contact with one, if not both, of our arms. There are literally hundreds of techniques that can be used. I would like to discuss a response to a same side wrist grab which culminates in a Cross Body Arm Bar.
Same side wrist grabs are more common than opposite side wrist grabs, though this series of movements can be done in response to opposite side wrist grabs as well- you just have to make a slight change in what I will show here.
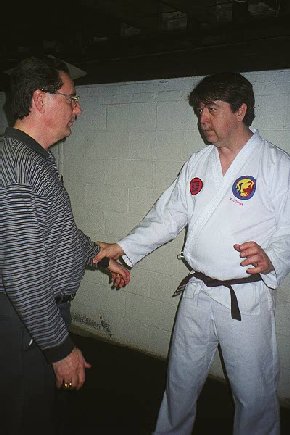
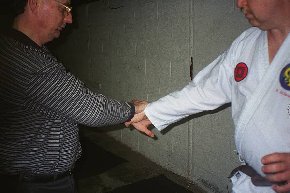
The situation begins in Figure 1: The Grab with an opponent grabbing your wrist. In Figure 2: The Trap, you trap your opponents grabbing hand. This is a critical part of the series of movements that you will be doing as you do not want him to be able to release his grip on your wrist. Trap him good!
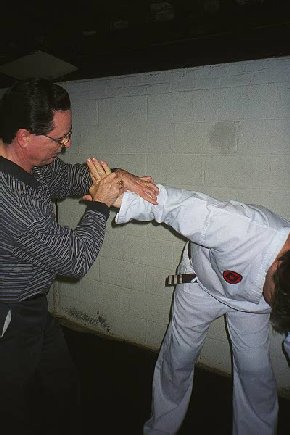
Now, to get to the position in Figure 3: The Lock, you will have to push quickly and sharply against the opponents arm in your Figure 2 trap position. He will do one of two things: he will either pull you toward him, or he will react by pushing toward you slightly. It is critical that you get him to do this. It is not important which action he takes; only that you get him to move his center of balance and to tense up. You can not do the next series of movements with the opponent in a static stance locked onto your wrist. The push that you give is intended to distract the opponent from his focus on grabbing your wrist to keeping his balance; that's all you are trying to do, and if you do it well you can easily get to the position shown in Figure 3 which is a simple wrist joint lock.
|
|
|
|
Figure 1
The Grab |
Figure 2
The Trap |
Figure 3
The Lock |
Figure 4
Standing Arm Bar |
In Figure 3: The Lock, note my left hand position and where I am pointing my left index finger. This wrist joint lock creates sharp and extreme pain in the opponents wrist. This effect is created by me exerting a pressure downward on his forearm and toward his center of mass with my left hand (that is why I am pointing at his midsection) coupled with a slight upward twisting of his hand with my right hand.
Now, you might be asking yourself why I am showing this lock so high in the air. We always teach locks of this sort be done using our center of mass and trying to position the opponents arm below our center of mass for critical leverage. Recall that I discussed how I preceed techniques of this kind by either pulling or pushing the opponent's arm causing him to react. Well, to effectively be taken advantage of, this reaction must not be "forced". The "natural" reaction process will most likely be circular. Thus, the position I am showing is to highlight the fact that I am more easily able to get the position for my lock during the circular (and in this case upward) reaction of the opponent. The application of the pain comes as the circle closes, as I am sure Rick will readily attest too (well, he did squeal and flop around quite a bit right after this picture was taken when I put the lock on!).
If you are strong enough and quick enough to get an opponent in this position, you can end the whole thing right here with a sharp dual twisting movement. Since most of us are not strong and will probably not be quick enough to do this, I always make the assumption with this technique that all you have been able to do is distract the opponent off his center of balance. That's why this is never the end of the technique when I teach it. I don't want to be standing there trying to wrestle some 200 pound drunk's arm. Once you distract the opponent, you must go right into the position shown in Figure 4, which is a standing arm bar.
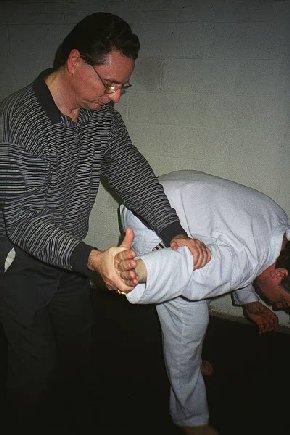
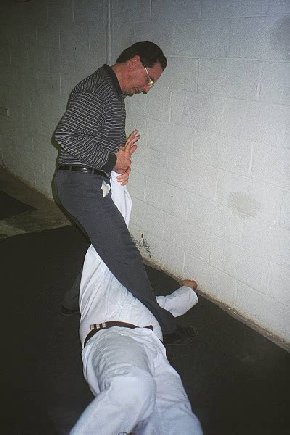
The next thing is to get this guy down and under control so that you can finish him. Here in Figure 5: The Break Down you see how easy it is to break him down. By taking the quick action you did in Figure 3, you have set him up for a clean shot.
 Again, you can not delay: you must go for the break down as an immediate follow through from the standing arm bar. If you don't, the opponent will not be inclined to simply stand there while you make up your mind what to do.
You must take your shot while he is under surprise and in pain. To take him down, note how I have used my leg closest to the opponent to do a pronated foot stomp to the back of his knee joint. You might be inclined to use your other leg to do a standard break down side kick, but as you will see in the next figure: this would disable the leg you will need to step into the final position of the technique.
Also note that I am retaining very tight control over the opponents arm during this break down process. You must never let the opponent go and do everything you can to prevent him from bending this arm. If he bends the arm, it will be more difficult to execute a clean cross body arm bar technique. Keep your grip tight and his arm straight!
In Figure 6: The Setup, you see why I chose my left leg to break the opponent down in Figure 5. I can now use my right leg to step across the opponents stomach to set him up for the next move, the drop.
 Again, you must move quickly and smoothly into this position. The opponents tendency is not going to be to lie on the ground too long- he is going to try to get up. That is why I want to cover his body with my right leg as opposed to covering his head with my left.
If I cover with my left leg, he has tremendous leverage to be able to swing his body out away from me and escape. By covering across his stomach, he will have to bring his head and chest up to get off the ground. I can easily control this either by a sharp kick to the back of his head, kneeling on his head with my left knee, applying a neck or jaw pressure point with my left fingers, or simply pressing on the top of his head with the palm of my left hand. Doing it this way gives me more leverage and control. Note that I still retain tight control of the opponents arm. Never lose sight of the need to control that arm! If you do: he's gone and you have missed your opportunity to make a clean finish. If the flow is broken, you will have to totally disengage from this technique as you will not be able to force your way back into it. You must disengage and clear. If you do not disengage and clear, the opponent stands a good chance of getting ahold of your leg and dragging you to the ground forcing you into a grapple.
This brings us to Figure 7: The Drop and Figure 8: The Crunch. Note carefully in Figure 7 that my leg positions have remained the same as they were in Figure 6. All I have done is to "sit down"- this is the drop. Don't try to do too many things at once: there will be plenty of time to swing your left leg over the opponent's neck and finish him.
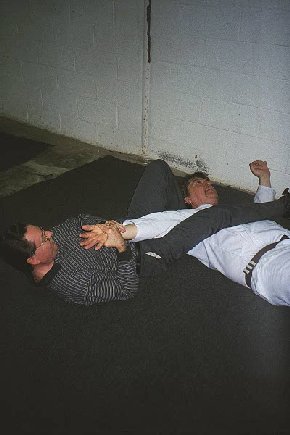 There are two methods of executing the drop: either you can go immediately into the crunch, or you can go into the control position. I strongly suggest the control position. Going to the crunch too soon sometimes causes you to either inflect more damage to the opponent than is warranted or you lose control of the positioning of the arm, do not exert enough pain compliance pressure, and the opponent is able to "roll out" of the hold and escape.
The drop position is critical and of itself is a compliance hold of sorts. While keeping the opponents arm straight, you must try to rotate it so that the person's elbow is braced against your hip area. In addition, you must try to get your hips/butt as close to the opponent's body as you can. The position of your left leg braced against the opponent's neck I find gives you a little more mobility in this positioning process.
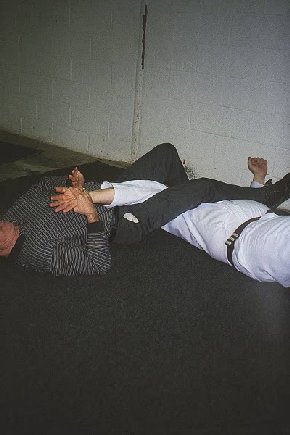
Now you are ready to go to your finish: the crunch. I call it the crunch because of the effect it has on the opponents arm: you are literally "crunching" it apart tearing ligaments and tendons. It does not take much pressure to do this, and so you must exert restraint as you apply pressure.
Pressure is applied by first swinging your left leg across the opponent's neck. Then, as seen in Figure 8, you simply roll your hips upward against the person's elbow as you arch your back and pull his forearm to your chest.
The pain is unbelievable, even with minimal pressure. However, this presents its own problem: If you apply to much pain to the opponent, his body will simply "shut down" and blank the pain out. It will almost be as though he goes into shock and feels nothing. He can become quite dangerous and you must be aware of this. If he feels no pain, you are in a bad position.
The key is to securely position yourself in the drop and then only apply enough pain for the person to hurt so badly that they simply give up. If you don't trust them, you can always give them a solid "spark" tearing minimally the muscles in the arm and stretching the tendons and ligaments a little so that as you disengage from your position the opponent has lost all interest and ability in pursuing you further.
In more serious situations, you just lay into the crunch and finish him. The pain factor will knock him out and he will have no use of his arm for months. A knife attack or other life threatening situation would create conditions appropriate for this level of defense.

 A karate practitioner
can apply many techniques to an attacker. Each technique that is applied follows some principle of application. Leverage, nerve striking, splitting the opponents centerline, body positioning and the principle of off balance are a few of the many different principles that can be utilized in an attack. Karate practitioners often combine one or more of these principles to make the technique more effective and more efficient. A karate practitioner should strive toward making their techniques effective, efficient and ultimately effortless.
A karate practitioner
can apply many techniques to an attacker. Each technique that is applied follows some principle of application. Leverage, nerve striking, splitting the opponents centerline, body positioning and the principle of off balance are a few of the many different principles that can be utilized in an attack. Karate practitioners often combine one or more of these principles to make the technique more effective and more efficient. A karate practitioner should strive toward making their techniques effective, efficient and ultimately effortless.